Table of contents
- Contents list of this kit (Just below)
- Using tool list
- Correction and surface finishing of the parts
- Spray coating process
- Brush painting and assembly
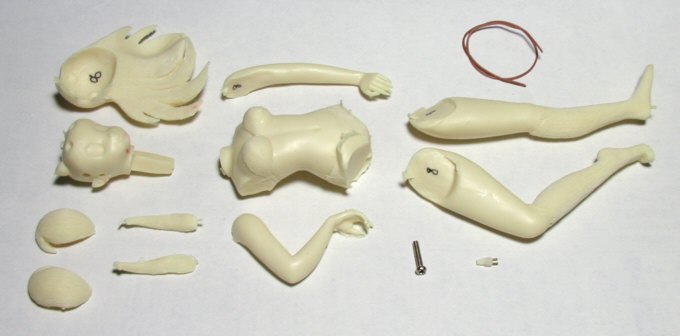  Molding parts -- 12, M2 screw -- 1, Single core wire (telephone wire) -- a little .
 The red portion (the bottom of a jaw or tip of the hair) had any casting defects and
I filled up there with resin later, so restoration is required.
  Since I used no silicon oil for casting, washing of the parts is unnecessary.
|
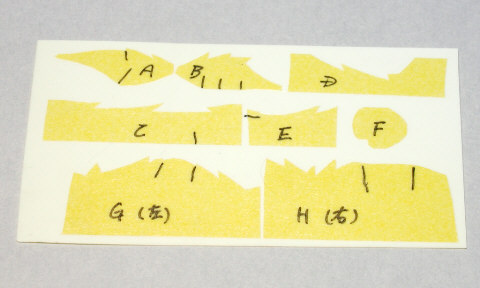
 This is the masking tape (made by TAMIYA co.) of the tiger bikini for service.
If you make them from the tape, you need continuation of the work - stick and remove
and cut a little, and you need over 1 hour.
I take 10 minutes or less for made them, only pile up with master and cut.
Since I don't attached all, please make another one - circularly near things,
such as for adhesion side of hand and foot.
  Since they does not necessarily fit exactly, if not, you can pile up them on the new
tape, and make them newly.
  Since the tapes which it finished using become a master when anything occurred,
Don't discard.
|
 Otherwise JPEG data FD for background drawings (thing with which Mr. Ohgami painted
on the comic monochrome picture, and I changed it in part) may be attached.
When it doesn't attached, please ask me by mail.
|
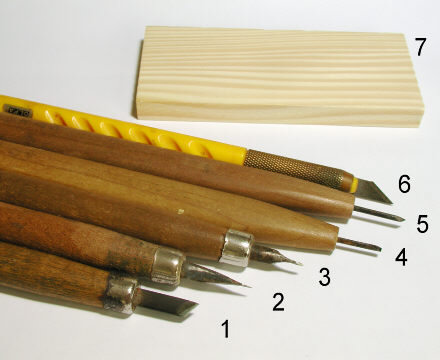
 The tools to be arranged - Edge version
 1: Angled knife(ordinary carving knife) For excision of the gate or burr. Let's grind it so that it may always become the sharpness highest. 2: 0.5mm Plane knife(I made from a carving knife) It is usable for correction of ultra finely portion, and the others for dropping the overflowing paint. 3: 1mm Plane knife(I made from a carving knife) It is usable for correction of the fine portion, and the others for instead of sticking of the putty serving. 4: 1.5mm Plane knife(on the market, about $10) For correction of the fine portion. 5: 1.5mm Angled knife(on the market, about \1000) Similarly for correction of the fine portion. 6: Pen knife(on the market) Mainly for the cutting of the masking tape. Partially using for burr removing. Let's use in the state of the sharpness highest with the new edge of a blade. 7: Edged tool underlay(board of boiled fish paste) |
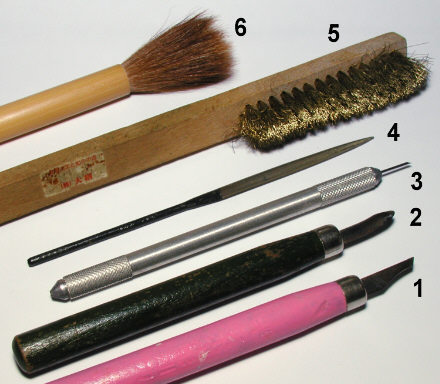
 The tools to be arranged - Shaving version 1
 1: Field shaving knife(3mm of edge width, I made from a carving knife) For shaving of the details which cannot use files and paper. Using that stand the edge and rub horizontally. The edge-of-a-blade angle is made obtuse than the ordinary carving knife. This is convenient to extend the cellular holes using likely a drill. 2: Field shaving round knife(I made from a carving knife) For shaving of the concave field which can't be use files or shaving paper. The edge of the blade is a plane, and I made the form near a secondary curve rather than simple circule. 3: Field shaving small round knife(on the market) This is a tool of a exchanging type of the tips, that sold a long time ago. It has the bits which of the tip of the circle pin or the square pin have cut aslant. Since the tips are coarse originally, I use them after sharpening by the fine whetstone. In the photograph, 1mm circle is attached. 4: Fine pitch half round file(on the market) The one of finest pitch. For the rough field forming such as after the putty coating. 5: Brass wire brush(about 1$) For the cleaning of the blind files. 6: Brush for eastern calligraphy(cheap one about 4$) For the cleaning of the shaving waste or the dust. Since the touch is good, it may be useful for attacking of the sweet spot of your girlfriend (^^; . |
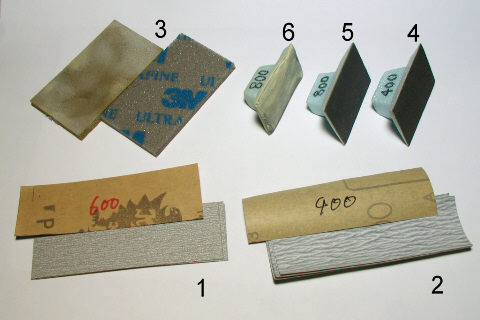
 The tools to be arranged - Shaving version 2
 1: Finishing paper #600 For the finishing of the field. Non-water resistance type is soft and easy to use. Cut it into about 25mm x 100mm. 2: Finishing paper #400 For rough-plane. 3: Sponge polish sheet In fact, I seldom use it for polishing the surface, but it is useful for removing the dust which adhered during spray paint. It shave and remove only dust, without damag of the coating surface when the paint is in the state of half dryness. 4-5-6: Sutairo-Sand(hand maid) This is the combination of a peace of "Sutairo-Home" (for housing heat insulation) cut into double pyramid form, and waterproof sand paper (#400,#800) by the double-sided stick tape. Use it attaching water. While it is new, use for finish of a valley corner part. But after long work, the corner becomes round and be for polish of the valley round part (=6). |
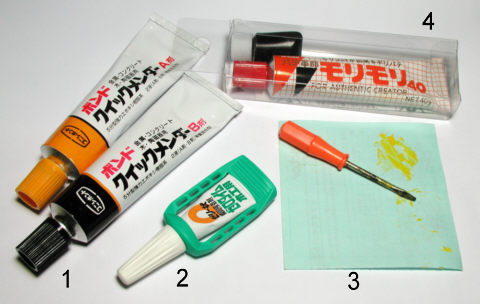
 Jell and the like
 1: Epoxy glue I almost use this for adhesion of the parts. Since this is a hardened type for 5 minutes, the adhesion strength becomes sufficient 1 hour after. 2: quick-cement I use this rarely. If you use it for this kit, the time of need to glue the plug and code at most. 3: Palette for jell This is nothing but a back paper of the delivery label or the video label. After the jell solidifies, coming off finely is pleasant. 4: Poly putty For stopgap or correction of the parts. Several years passed one has bad mobility and after hardening the surface has viscosity and has influences for the finish, let's use a new thing. |
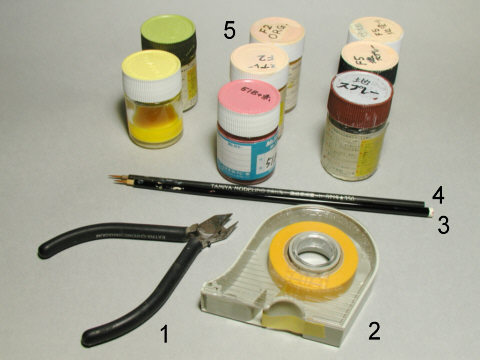
 Kinds of painting - Part 1
 1: Precise nipper For cutting the masking tape. 2: Masking tape(made by Tamiya co.) For the sense of security when removing, the product made by Tamiya is the best. It's the best three kinds of tape width -- 6mm, 10mm, and 18mm -- are prepared. 3-4: Looks brushes(about 3$-4$) I use only these brushes for almost brush coating portions. I use #3 for bright color (warm color = red system) and #4 for dark colors (cold color = blue system), and prevent the color blot. 5: Lacquer paint(since these are old bottle, capacity is large) I mix all of the skin colors by myself. Rather than mixing yellow and red with white, mixing orange with white prevent fading reddish tint. Since standard color No.51 is strong for fading, using this color for the base and mixing white is a better choice. I use 2 skin colors for the ground coating and for the finishing. I mix the colors for finish flat base for make it lusterless. Since there are two bottles for the undiluted solution (for brush coating) and sprays respectively, there are four nearly same color. |
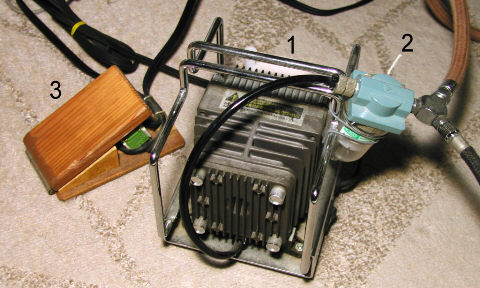
 Kinds of painting - Part 2
 1: Air compressor This is a linear type "L5" by Gunze. Although the pressure is 1.2 MPa, this is enough for paint of small one. The silent noise is good above all. Still the vibration echoes to the floor unexpectedly, it will be thoroughgoing by spreading a cushion under it. The price is about 200$. 2: Drain The effect of this model is not so good, so the hand piece blows water when the weather are bad. This may remove half of the water in a soothing grade. 3: Foot switch(Self made) Switching on and off the compressor one by one or putting it on long time is troublesome, so using a foot switch is convenient. You can get commercial goods about 20$. |
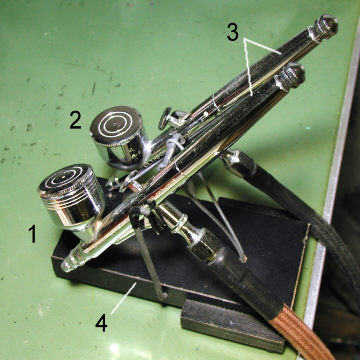
 Kinds of painting - Part 3
 1-2: Hand piece Both apertures are 0.3mm. Although #1 is Wave brand and #2 is Olympos, both manufactured by Olympos. The type of Wave has a needle stopper (#3: This adjust the amount of blow off of paint), and it is indispensable to thin blow. Since this stopper has attachment compatibility, you can use also for Olympos. Let's order the part. The cup of Wave has a cone bottom, so you can blow small quantity (several drops), I recommend this. I use appropriately them, for bright color is Wave and dark color Olympos. 4: Stand(Self made) I made this with plywood and steel wire. I attached rubber foot for prevent sliding. Since the hook part falls down ahead, storage space is not musch taken. |
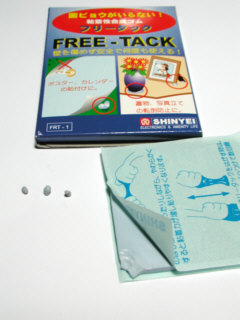
 The others - Convenient goods
 Free Tack Although not used as a material, this is useful when temporary assembling at the time of checking the pause. The size of nose dirt is enough, and this is economical that can use removing repeatedly. |
|
|
Return to the Figures Making Data Mansion